If you are like most system administrators, you will want to monitor everything you can. Enabling SNMP on each of your devices helps you in this task. If you have VMware ESXi servers, you will want to enable SNMP on ESXi also. So, here’s how.
Startup VMware ESXi SNMPd Service
You can startup the SNMPd on the VMware ESXi host by logging in to either the Windows vSphere client or the vSphere Web Client. By the way, you will need to configure each host that you wish to monitor individually.
So, click on a host, click on the Settings button, and choose the Security Profile option. This will display the services in the right pane. Then hit the “Edit” button.
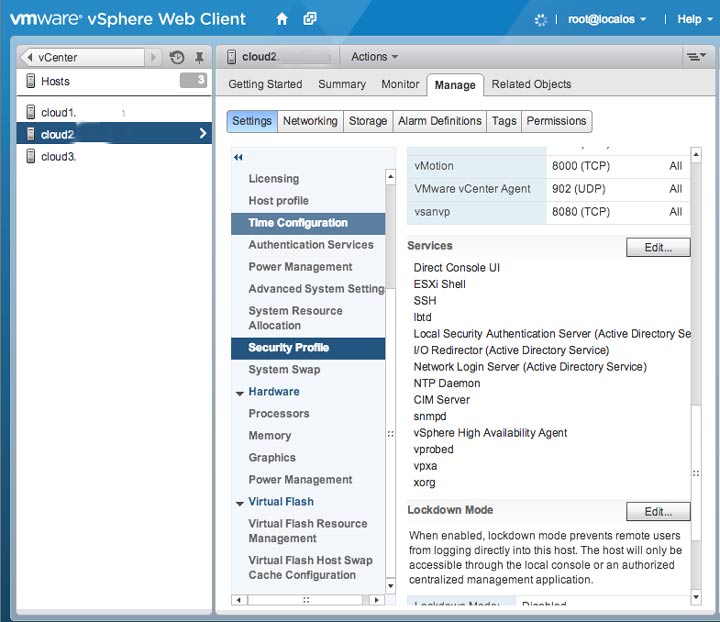
Configure ESXi Services in vSphere Web Client
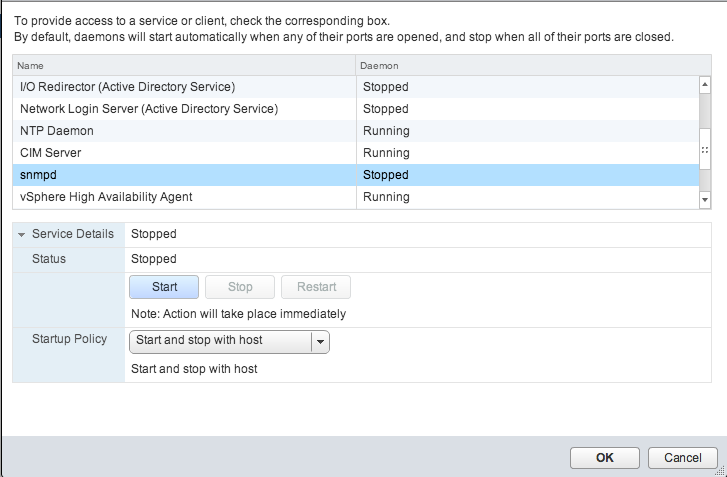
This will take you to an editable list of services that you can start / stop / restart or modify the startup policy.

Configure ESXi Services in vSphere Windows Client
At this point, let’s catch you up quickly if you are using the VMware vSphere Windows client. Click on a host, go into the configuration tab. Find the services area, and click properties.

Find the snmpd service in the list and click the options button.
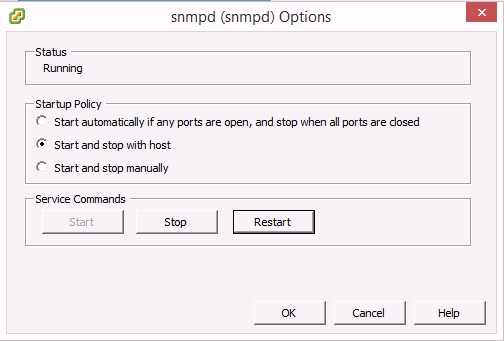
You will see the Start / Stop / Restart and the Startup Policy.
And with that, we should be all caught up.
At this point, hit the start button and change the startup policy to Start and stop with host.
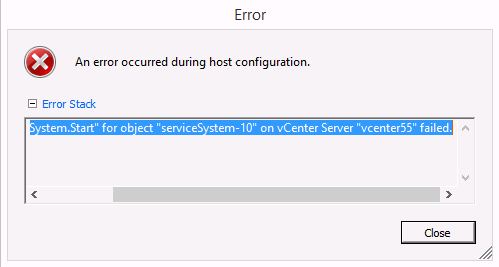
Potential – system.start for object serviceSystem-10 failure – Error
Depending on your server’s past, whether it has been configured before or not, you have a pretty good chance of receiving an error like the following:
system.start for object serviceSystem-10 on vcenter server <your server name here> failed
If this happens to you then we will need to login to the console of your VMware ESXi host to configure the /etc/vmware/snmp.xml file. To do this, ssh into the ESXi host an edit the file, You will need to make it look similar to this:
<?xml version="1.0"?>
<config><snmpSettings><enable>true</enable><port>161</port><communities>PUT-YOUR-SNMP-PASSWORD-HERE</communities><targets>MONITORING-SERVER-IP-ADDR-HERE</targets></snmpSettings></config>
Be sure to backup your original file before editing and set the password and the ipaddress in the fields marked in the example.
With this done, save the file and you should be able to now return to the steps above and startup the snmpd service.
Test Your VMware ESXi SNMPd Service with Snmpwalk
The simplest way to test your snmpd service is to walk it with snmpwalk on your linux server. This will return tons of information about your ESXi server. In another article, we will configure a client to read and use and graph some of this information to make it useful. My snmpwalk returned 4005 lines!
$ snmpwalk -v 1 -c YOUR-COMMUNITY-PASSWORD-HERE cloud1.uptimemadeeasy.com

SNMPv2-MIB::sysDescr.0 = STRING: VMware ESXi 5.5.0 build-1331820 VMware, Inc. x86_64
SNMPv2-MIB::sysObjectID.0 = OID: SNMPv2-SMI::enterprises.6876.4.1
DISMAN-EVENT-MIB::sysUpTimeInstance = Timeticks: (12300) 0:02:03.00
SNMPv2-MIB::sysContact.0 = STRING:
SNMPv2-MIB::sysName.0 = STRING: cloud1.1on1.com
SNMPv2-MIB::sysLocation.0 = STRING:
SNMPv2-MIB::sysServices.0 = INTEGER: 72
SNMPv2-MIB::sysORLastChange.0 = Timeticks: (0) 0:00:00.00
SNMPv2-MIB::sysORID.1 = OID: SNMPv2-MIB::snmpMIB
SNMPv2-MIB::sysORID.2 = OID: IF-MIB::ifMIB
SNMPv2-MIB::sysORID.3 = OID: IP-MIB::ip
SNMPv2-MIB::sysORID.4 = OID: IP-FORWARD-MIB::ipForward
SNMPv2-MIB::sysORID.5 = OID: UDP-MIB::udp
SNMPv2-MIB::sysORID.6 = OID: TCP-MIB::tcp
SNMPv2-MIB::sysORID.7 = OID: SNMPv2-SMI::mib-2.47
…
Success!!
Now we repeat the same process for each of the hosts in our VMware cluster that we want to monitor with SNMP. In one of my upcoming articles we will discuss capturing and graphing SNMP data with cacti.
Just a Little Extra – Download Latest VMware vSphere 5.5 Mibs
So, for a little extra credit, you can download and install the latest VMware vSphere Mibs. Login to http://www.VMware.com and find them in the downloads section:
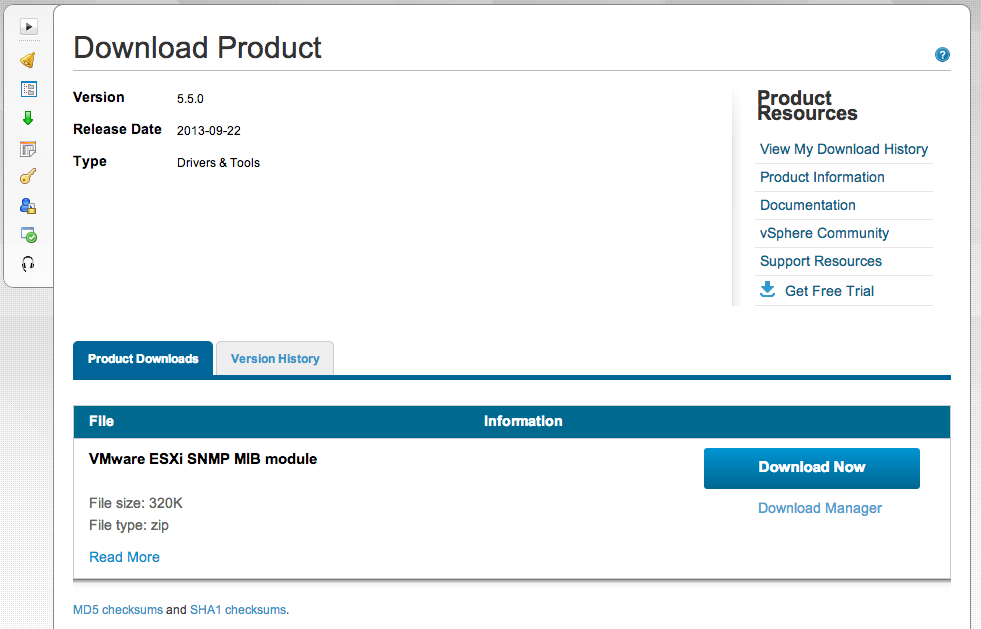
Download Latest VMware vSphere Mibs
To finish the installation, unzip and put the files into the /usr/share/snmp/mibs directory.
Latest posts by Jeff Staten (see all)
- Configure Your HP Procurve Switch with SNTP - May 5, 2015
- Configuring HP Procurve 2920 Switches - May 1, 2015
- Troubleshooting Sendmail - November 28, 2014

A very useful post, thank you sir!
Just a side note to that: you could highlight the true in snmp.xml; seems to be defaulted to false and as the file is a one-liner I didn’t notice it before indenting it. It didn’t start with the XML doctype either, don’t know if that changes anything though.
And Thank you Rob Air!
I have changed the true to bold. I am not sure why the doc type line prevented the startup for you as it worked on my hosts. But regardless, if it is now working for you, then everything should be happy.
What server upload MIB files into directory /usr/share/snmp/mibs (ESXi or SNMP Server) ?
I don’t find /usr/share/snmp/mibs folder on both server (ESXi or SNMP Server)
Thank you.
prasitchal,
The MIB files are uploaded on the machine that is doing the monitoring. For example, my Cacti or Nagios Server would need the MIB files. There is no reason to put the MIB files on the machine being monitored.
hi dear jeff
thank you for this nice description
there is no snmp folder in esxi 5.1 how to get around it
Hamid,
Unfortunately, I don’t have a ESXi 5.1 environment to work with to answer your question. I suppose that you could upgrade to 5.5 and then follow my directions. Another option is to look at other articles elsewhere such as this one: http://geraldomagellajunior.wordpress.com/2013/04/11/enablingactivating-snmp-on-esxi-5-1-host/ that may have helpful information.