HP’s Procurve 2920-48G and 2920-48G-PoE+ Switches
I recently had an opportunity to test out some HP 2920 switches for the office. We chose to use both HP 2920-48G and HP 2920-48G-PoE+ switches. We were looking for switches with 10G capability (Add the fiber sfp+ module to the back, or add the 10G over CAT6 module –also to the back), console port configuration as an option, and a few other items. Anyway, I thought that I would share a few notes that I made during the process in this article.
HP 2920 Initial Configuration
Before you can manage the switch, you need to configure it, and luckily, these 2920’s are really easy
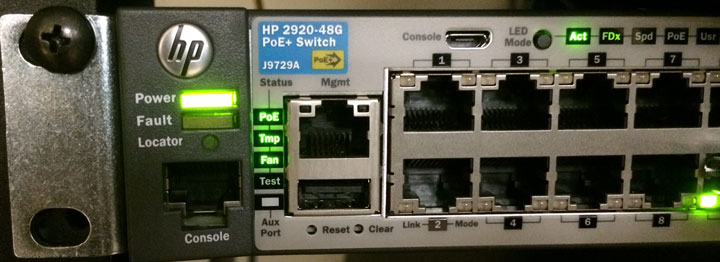
HP-2920-48G-PoE Procurve Console Port
with the serial console port. You need to find the RJ45 to 9-pin serial console cable in the box with your switch. Plug the RJ45 end into the console port which you will find on the left-hand side of the front of the switch and plug the 9-pin serial end into the serial port of your computer. My MacBook Pro doesn’t have a serial port, so I picked up a Tripp Lite Keyspan Converter to give me one.
Next, you need to find a terminal emulator. If you are using windows, you can use PuTTY Terminal Emulator or HyperTerminal. On my MacBook Pro, I use ZTerm. Anyway, launch your terminal emulator and configure it to speak to your serial port using the proper settings.
HP Procurve Switch Console Port Settings
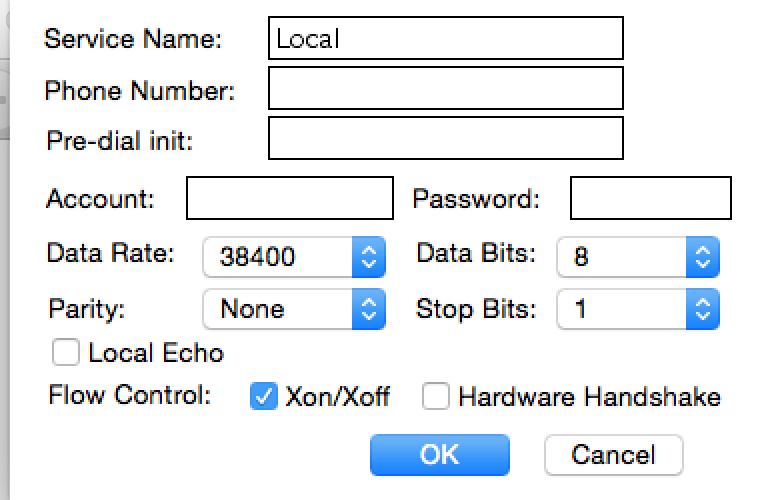
Configure Your Terminal Emulator to Communicate with Your HP Procurve 2920 Switch
The HP 2920 Switches Installation and Getting Started Guide explains on page 2-24 the serial port connection settings. My Zterm connected instantly without any changes from the default, but here are the settings you need to use:
- Any Baud Rate between 1200 and 115200
- 8 data bits
- 1 stop bit
- no parity
- flow control – Xon/Xoff
Set the configuration above and then hit return a couple of times and it will drop you into a prompt where you can begin configuring the switch. The default prompt is “HP-2920-48G#”. Type “setup” and hit return and you will be able to configure the basic settings — most importantly, the manager password and the network configuration information.
HP-2920-48G# setup

HP-2920-48G                                                 1-Jan-1990   0:05:50
==========================- CONSOLE - MANAGER MODE -============================
                                  Switch Setup

  System Name : MyCoolHPSwitch
  System Contact : Bobby Smith
  Manager Password : ****************
  Confirm Password : ****************
  Logon Default : CLI                   Time Zone [0] : 0
  Community Name : MyCommunityString    Spanning Tree Enabled [No] : No
  Default Gateway : 10.99.99.1
  Time Sync Method [None] : TIMEP
  TimeP Mode [Disabled] : Disabled


  IP Config [Manual] : Manual

  IP Address  : 10.99.99.5
  Subnet Mask : 255.255.255.0
 Actions->   Cancel     Edit     Save     Help

Enter System Name - up to 32 characters.
Use arrow keys to change field selection, <Space> to toggle field choices,
and <Enter> to go to Actions.
Note that network configuration settings are for the default VLAN (vlan-1). If you configure other VLANs, each can be configured with its own management IP Address. Hit the return key after setting all of the above configuration and then arrow over to the save options and hit return again. If you are pinging the IP Address and you are properly connected to the switch, then you will see the switch beginning to reply.
Several Configuration Options from this Point
Once you get your network configuration setup and saved, you should now be able to connect to the switch through SSH, http, or continue with the console port where you can configure your VLANs, SNMP, monitor traffic, port trunking, or whatever else you need. Look for more articles on using the HP 2920 Procurve Switches here in the near future.
Latest posts by Jeff Staten (see all)
- Configure Your HP Procurve Switch with SNTP - May 5, 2015
- Configuring HP Procurve 2920 Switches - May 1, 2015
- Troubleshooting Sendmail - November 28, 2014