I had a nice little virtual machine running on a VMWare esxi cluster. The filesystem was getting a bit full so I though I would take some notes as I went through the steps to grow the filesystem from the VMWare datastore all the way through volume group extension to the filesystem resizing. Some of the tasks assume that your filesystem is built on Linux volume groups. This article will step you through what you need to know to Grow an ext4 Filesystem on a VMWare Esxi Virtual Machine.
Caution! Caution!
Because you are working with disk storage at this point, and could damage what is stored on your filesystems, you need to be sure to read through these instructions and perhaps others to be sure that you understand the steps that you are taking and how it relates to the data stored on the disk storage.
Increase the Size of Your Virtual Machine’s Hard Disk
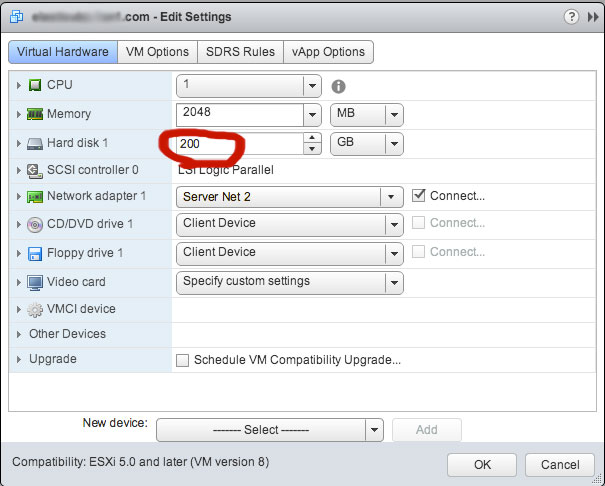 Using vCenter Web or Windows client, edit the virtual machine and resize the Hard disk or add a second one. In the image to the right, we are increasing the size of Hard Disk 1 using the vCenter Web Client (vCenter/Esxi 5.5).
After increasing the disk’s size, I rebooted the virtual machine.
Use Fdisk to Create a Partition
In my case, I only had one disk (/dev/sda). Previous to these steps, /dev/sda1 contains /boot and /dev/sda2 is under volume management control where all of the other filesystems are contained. Since I increased the size of /dev/sda, I need to partition the new unused part of the disk. Note: all of the things I typed below are in blue. I do this task with fdisk and tell it my disk device name: “fdisk /dev/sda”. Then I told it I wanted to create a new partition (n), specified it as a primary partition (p), and gave it the partition number of 3. When that was done, I used the p option to print out the disk partition table to see the changes (the changes are in green).
# fdisk /dev/sda

WARNING: DOS-compatible mode is deprecated. It's strongly recommended to
         switch off the mode (command 'c') and change display units to
         sectors (command 'u').

Command (m for help): n
Command action
   e   extended
   p   primary partition (1-4) p
Partition number (1-4): 3
First cylinder (26109-39162, default 26109):
Using default value 26109
Last cylinder, +cylinders or +size{K,M,G} (26109-39162, default 39162): <carriage return>
Using default value 39162

Command (m for help): p

Disk /dev/sda: 322.1 GB, 322122547200 bytes
255 heads, 63 sectors/track, 39162 cylinders
Units = cylinders of 16065 * 512 = 8225280 bytes
Sector size (logical/physical): 512 bytes / 512 bytes
I/O size (minimum/optimal): 512 bytes / 512 bytes
Disk identifier: 0x000250b3

   Device Boot      Start         End      Blocks   Id  System
/dev/sda1   *           1          64      512000   83  Linux
Partition 1 does not end on cylinder boundary.
/dev/sda2              64       26109   209202176   8e  Linux LVM
/dev/sda3           26109       39162   104853565   83  Linux

Command (m for help):
We were successful in creating a new partition that contains the rest of the unused disk space. Next, we need to change the partitions’s system id tag. You can see the it is currently “83 Linux” and we want to change it to “8e Linux LVM”. I do this by using the (t) option, tell it the partition number (3), list the options (L), type in the Hex Code (8e), and print out (p) the partition table to see the changes. Finally, when I see that things are done how I want, I use the (w) option to write the changes to the partition table.
Command (m for help): t
Partition number (1-4): 3
Hex code (type L to list codes): L
0 Empty 24 NEC DOS 81 Minix / old Lin bf Solaris
1 FAT12 39 Plan 9 82 Linux swap / So c1 DRDOS/sec (FAT-
2 XENIX root 3c PartitionMagic 83 Linux c4 DRDOS/sec (FAT-
3 XENIX usr 40 Venix 80286 84 OS/2 hidden C: c6 DRDOS/sec (FAT-
4 FAT1641 PPC PReP Boot 85 Linux extended c7 Syrinx
5 Extended 42 SFS 86 NTFS volume set da Non-FS data
6 FAT16 4d QNX4.x 87 NTFS volume set db CP/M / CTOS / .
7 HPFS/NTFS 4e QNX4.x 2nd part 88 Linux plaintext de Dell Utility
8 AIX 4f QNX4.x 3rd part 8e Linux LVM df BootIt
9 AIX bootable 50 OnTrack DM 93 Amoeba e1 DOS access
a OS/2 Boot Manag 51 OnTrack DM6 Aux 94 Amoeba BBT e3 DOS R/O
b W95 FAT32 52 CP/M 9f BSD/OS e4 SpeedStor
c W95 FAT32 (LBA) 53 OnTrack DM6 Aux a0 IBM Thinkpad hi eb BeOS fs
e W95 FAT16 (LBA) 54 OnTrackDM6 a5 FreeBSD ee GPT
f W95 Ext'd (LBA) 55 EZ-Drive a6 OpenBSD ef EFI (FAT-12/16/
10 OPUS 56 Golden Bow a7 NeXTSTEP f0 Linux/PA-RISC b
11 Hidden FAT12 5c Priam Edisk a8 Darwin UFS f1 SpeedStor
12 Compaq diagnost 61 SpeedStor a9 NetBSD f4 SpeedStor
14 Hidden FAT16 63 GNU HURD or Sys ab Darwin boot f2 DOS secondary
16 Hidden FAT16 64 Novell Netware af HFS / HFS+ fb VMware VMFS
17 Hidden HPFS/NTF 65 Novell Netware b7 BSDI fs fc VMware VMKCORE
18 AST SmartSleep 70 DiskSecure Mult b8 BSDI swap fd Linux raid auto
1b Hidden W95 FAT3 75 PC/IX bb Boot Wizard hid fe LANstep
1c Hidden W95 FAT3 80 Old Minix be Solaris boot ff BBT
1e Hidden W95 FAT1
Hex code (type L to list codes): 8e
Changed system type of partition 3 to 8e (Linux LVM)
Command (m for help): p

Disk /dev/sda: 322.1 GB, 322122547200 bytes
255 heads, 63 sectors/track, 39162 cylinders
Units = cylinders of 16065 * 512 = 8225280 bytes
Sector size (logical/physical): 512 bytes / 512 bytes
I/O size (minimum/optimal): 512 bytes / 512 bytes
Disk identifier: 0x000250b3
Device    Boot   Start   End    Blocks Id System
/dev/sda1   *      1      64    512000 83 Linux
Partition 1 does not end on cylinder boundary.
/dev/sda2         64   26109 209202176 8e Linux LVM
/dev/sda3      26109   39162 104853565 8e Linux LVM

Command (m for help): w
The partition table has been altered!

Calling ioctl() to re-read partition table.

WARNING: Re-reading the partition table failed with error 16: Device or resource busy.
The kernel still uses the old table. The new table will be used at
the next reboot or after you run partprobe(8) or kpartx(8)
Syncing disks.
Add the New Partition to the Linux Volume Group Using Pvcreate and Vgextend
At this point, you need to know the name of the volume group that your logical volumes belong to. You can list all of the volume groups on the system using the vgdisplay command. In this example, the volume group name is vg_elasticube:
# vgdisplay
  --- Volume group ---
  VG Name               vg_elasticube
  System ID
  Format                lvm2
  Metadata Areas        1
  Metadata Sequence No  4
  VG Access             read/write
  VG Status             resizable
  MAX LV                0
  Cur LV                3
  Open LV               3
  Max PV                0
  Cur PV                1
  Act PV                1
  VG Size               199.51 GiB
  PE Size               4.00 MiB
  Total PE              51074
  Alloc PE / Size       51074 / 199.51 GiB
  Free  PE / Size       0 / 0
  VG UUID               0rnKA4-HKZx-G1co-8coe-oOxm-w3vi-nSf63Q
We now use the pvcreate <partition device path>, then we use vgextend to add it to the volume group:
# pvcreate /dev/sda3
Physical volume "/dev/sda3" successfully created
# vgextend vg_elasticube /dev/sda3
Volume group "vg_elasticube" successfully extended
We can now see our new free space that we just added to the volume group:
# vgdisplay vg_elasticube | grep "Free"
  Free  PE / Size       25598 / 99.99 GiB
Next, We extend the logical volume of the filesystem that we are expanding:
# lvextend -L+99G  /dev/vg_elasticube/lv_home
  Extending logical volume lv_home to 275.04 GiB
  Logical volume lv_home successfully resized
At this point, I like to unmount the filesystem so that there is no risk of messing up the filesystem while it is getting resized. Typically, I use umount </filesystem-name>. If the filesystem is busy, you can comment out the filesystem in the /etc/fstab file and reboot the machine.
Verify the Ext4 Filesystem Using e2fsck
Before we resize the filesystem, we check the filesystem first using e2fsck to verify it is healthy:
# e2fsck -f /dev/vg_elasticube/lv_home
e2fsck 1.41.12 (17-May-2010)
Pass 1: Checking inodes, blocks, and sizes
Pass 2: Checking directory structure
Pass 3: Checking directory connectivity
Pass 4: Checking reference counts
Pass 5: Checking group summary information
/dev/vg_elasticube/lv_home: 8715/11542528 files (7.1% non-contiguous), 4488175/46147584 blocks
Resize the ext4 Filesystem
With the filesystem checked, it is all ready to resize using the resize2fs command:
# resize2fs /dev/vg_elasticube/lv_home 275G
resize2fs 1.41.12 (17-May-2010)
Resizing the filesystem on /dev/vg_elasticube/lv_home to 72089600 (4k) blocks.
The filesystem on /dev/vg_elasticube/lv_home is now 72089600 blocks long.
Now that the filesystem is expanded, we check it again using e2fsck all over again:
# e2fsck -f /dev/vg_elasticube/lv_home
e2fsck 1.41.12 (17-May-2010)
Pass 1: Checking inodes, blocks, and sizes
Pass 2: Checking directory structure
Pass 3: Checking directory connectivity
Pass 4: Checking reference counts
Pass 5: Checking group summary information
/dev/vg_elasticube/lv_home: 8715/18022400 files (7.1% non-contiguous), 4895774/72089600 blocks
Finally, we can remount our filesystem. When we do, note that it is now larger!
# mount /data
# df -h /data
Filesystem            Size  Used Avail Use% Mounted on
/dev/mapper/vg_elasticube-lv_home
                      271G   15G  243G   6% /data
Our task is done and our filesystem is the new size.
Remember if you edited the /etc/fstab file earlier to prevent the filesystem from mounting, reverse your changes to how they were before.
Other Resources:
http://wiki.centos.org/TipsAndTricks/ExpandLV?highlight=%28vgdisplay%29
Latest posts by Jeff Staten (see all)
- Configure Your HP Procurve Switch with SNTP - May 5, 2015
- Configuring HP Procurve 2920 Switches - May 1, 2015
- Troubleshooting Sendmail - November 28, 2014