If you have been around VMWare long, then you have cloned, restored or otherwise copied a virtual machine. When the copied virtual machine is created, it is given a different MAC address, which causes VMWare to see its network adapter as eth1. This will result in eth1 being assigned either a DHCP address at boot if available or to use a self-assigned address if not. This article shows how to fix this problem using Linux, but whatever operating system you are using, the steps are similar.
Bringing Up Interface Eth0: Error: No Suitable Device Found: No Device Found for Connection ‘System Eth0’
The problem begins when, after cloning a virtual machine, the eth0 device cannot be found by the kernel. You will normally notice an error during boot similar to: “Bringing up Interface eth0: Error: No suitable device found: no device found for connection ‘System eth0’.

Bringing up Interface eth0: Error: No suitable device found: no device found for connection ‘System eth0’
As I mentioned above, this is caused when the new virtual machine is created. VMware has assigned an ethernet adapter to the virtual machine with a different MAC address than what the source VM was using.
This issue is fairly simple to resolve.
Find the New MAC Address for Your Network Adapter
There are many ways to find the new MAC address assigned to your network adapter. Since this is VMWare, you can simply edit your virtual machine in VMWare and look at the MAC Address assigned to “Network adapter 1”. Or even simpler is to use ifcfg to list the adapters on the machine. In the example below, you can see that this example machine, (a clone of my quickbook server) couldn’t find eth0 by MAC address and assumed it was eth1 and then picked up a DHCP address instead of using the configured address for eth0:
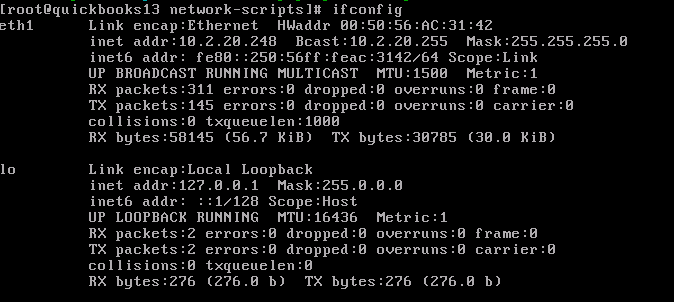
ifconfig shows eth1 instead of eth0
Edit the /etc/sysconfig/network-scripts/ifcfg-eth0 File
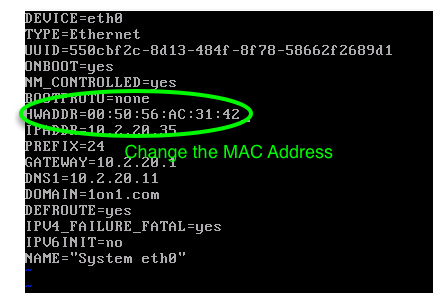
Edit the MAC address in /etc/sysconfig/network-scripts/ifcfg-eth0
With this information, grab the HWaddr, we will then edit the /etc/sysconfig/network-scripts/ifcfg-eth0 file and change the HWADDR parameter to the MAC address that you found in one of the 2 steps above.
Use a Unique IP Address
Since this is a clone of a current server, you will want to be sure, since you are already in this file that the IP Address assigned to this adapter is unique on your network. If the source virtual machine that you cloned this machine from, you will want to resolve the conflict before continuing.
Restart the Network Service
After changing the MAC address, you will need to either reboot the operating system or restart the network adapter service. In my case, as I was on the console of this CentOS 6 machine, I simply restarted the network service:
# service network restart
which brought up eth0 now using the assigned IP Address. At this point, your eth0 should now be up and using the desired IP Address.
Latest posts by Jeff Staten (see all)
- Configure Your HP Procurve Switch with SNTP - May 5, 2015
- Configuring HP Procurve 2920 Switches - May 1, 2015
- Troubleshooting Sendmail - November 28, 2014
i tried doing the above… but it did not work… 🙁
I checked the output of ethtool eth0
It shows link is not detected…
Any help would be appreciated…. 🙂
Kalpesh,
Do you notice if eth1 is enabled and available. What often happens in these cases is that it thinks eth0 is a new device and adds it as eth1.
Aaah! Very trivial thing that went unnoticed. Thanks Jeff! 🙂
LIFE SAVING!!
Thanks Jeff for this article.
we did not have MAC parameter inside ifcfg-ether file, but we updated device name and it fixed the issue as well. Thanks
thanks, saved my day
Works like a charm… thanks
Thanks, it works!
Thank you so much!! worked perfectly!