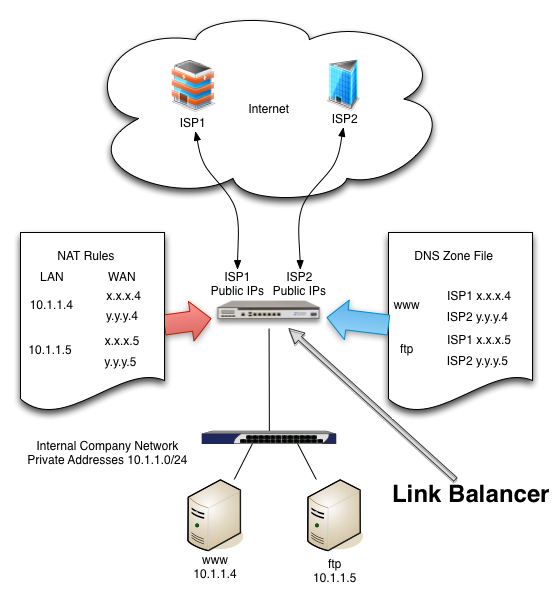
When you are running a very small business, you often don’t have the time to mess with having a centralized windows or mac directory server handle your DHCP for you. In these cases, if you happen to have a Cisco router, you can configure DHCP on your Cisco router so that it will manage the DHCP services for you. Here’s how you would configure dhcp on cisco routers:
Step 1 – ssh login, get on the console, or use telnet if that is enabled to the cisco router
# ssh -l <username> <ipaddress of the Cisco router>
Step 2 – Enter configuration mode
myrouter# config t
Step 3 – Configure the network addresses that will not be assigned to DHCP clients:
myrouter(config)# ip dhcp excluded-address 10.2.30.1 10.2.30.31
Step 4 – Configure the DHCP Pool – including the network, domain-name, dns-servers, the default router and the length of the lease:
ip dhcp pool MYDHCPPOOL
network 10.2.30.0 255.255.255.0
domain-name mydomain.com
dns-server 208.67.222.222 208.67.220.220
default-router 10.2.30.1
lease 0 12
Step 5 – Save the router configuration for the next boot:
myrouter(config)# exit
myrouter# wr mem
That’s it. It should be up and working. Please be careful not to have 2 different servers supplying DHCP addresses on the same network. This will get very confusing for all of the DHCP clients and will likely cause a broadcast storm leading to nothing working well on your network. If this does occur to you, simply assign your workstation a static address and log back into the router and change the first command in step 4 to be:
myrouter(config)# no dhcp pool MYDHCPPOOL
which should turn off dhcp on your router until you can turn off DHCP on the other DHCP server.
Latest posts by Jeff Staten (see all)
- Configure Your HP Procurve Switch with SNTP - May 5, 2015
- Configuring HP Procurve 2920 Switches - May 1, 2015
- Troubleshooting Sendmail - November 28, 2014