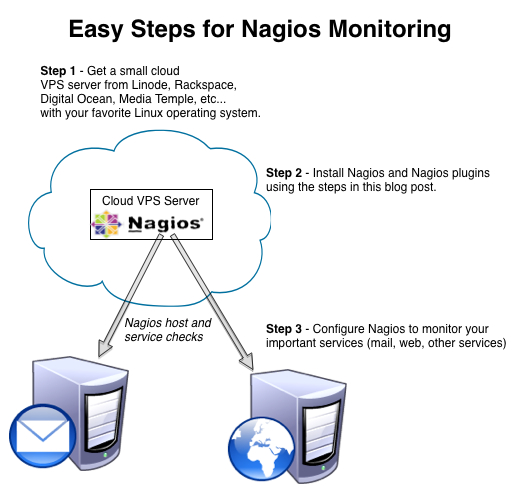
While you can configure your ReadyNAS to send you alerts about issues with your ReadyNAS device, there is a huge flaw in having a device report about itself … it won’t be able to send you alerts if it is down, whereas having another device monitor it will be able to alert you if it is down. In this article, we will discuss monitoring your ReadyNAS with Nagios through SNMP (Simple Network Management Protocol) monitoring checks. In this article, we discuss how to Monitor ReadyNAS with Nagios.
Enable SNMP on ReadyNAS

ReadyNAS – Turn on SNMP
The first step is to enable SNMP on the ReadyNAS device. You do this in the admin interface by going to the “System” menu and then hitting the “SNMP” button.
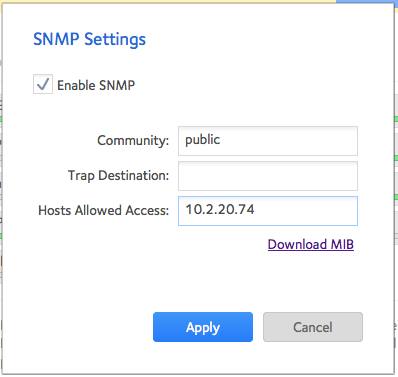
ReadyNAS 2120 – Configure SNMP Settings
This will bring up the SNMP Settings configuration page. You will want to configure it by using the following options:
- Enable SNMP – Check the box to enable SNMP
- Community – Enter your SNMP community string. This is kind of like a password required to get SNMP information from the device.
- Trap Destination – Enter the address where you want the device to send SNMP traps. (optional for the task described in this article.)
- Hosts Allowed – Enter the IP address of Hosts that can communicate with this ReadyNAS with SNMP.
With these items configured, hit the “Apply” button and you are done configuring the options in the ReadyNAS device. But don’t close the SNMP settings window yet because you will need to click the Download MIB link to get the MIB for your nagios server to use.
Install the ReadyNAS SNMP MIB in Your Server
Next, we need to install the MIB file for the ReadyNAS in your server. I am using a CentOS 6 server for this example. You will want to download the file using the link that you see above in the SNMP settings box above. You can download it to the proper directory using the following commands:
# cd /usr/share/snmp/mibs
# wget --no-check-certificate https://<ipaddress of the READYNAS>/READYNASOS-MIB.txt
Snmpwalk Your ReadyNAS
With the MIB in place, you can now test it out using snmpwalk. You will need to have installed net-snmp-utils before hand to make it work:
# yum install net-snmp-utils
With net-snmp-utils installed, you should now be able to snmpwalk your ReadyNAS:
# snmpwalk -v 1 -c public 10.2.20.4 | more
SNMPv2-MIB::sysDescr.0 = STRING: Linux tcpanas 3.0.93.RN2120.1 #1 SMP Mon Sep 30 11:52:43 PDT 2013 armv7l
SNMPv2-MIB::sysObjectID.0 = OID: NET-SNMP-MIB::netSnmpAgentOIDs.10
DISMAN-EVENT-MIB::sysUpTimeInstance = Timeticks: (183742) 0:30:37.42
SNMPv2-MIB::sysContact.0 = STRING: root
SNMPv2-MIB::sysName.0 = STRING: tcpanas
SNMPv2-MIB::sysLocation.0 = STRING: Unknown
SNMPv2-MIB::sysORLastChange.0 = Timeticks: (2) 0:00:00.02
SNMPv2-MIB::sysORID.1 = OID: SNMP-FRAMEWORK-MIB::snmpFrameworkMIBCompliance
SNMPv2-MIB::sysORID.2 = OID: SNMP-MPD-MIB::snmpMPDCompliance
SNMPv2-MIB::sysORID.3 = OID: SNMP-USER-BASED-SM-MIB::usmMIBCompliance
SNMPv2-MIB::sysORID.4 = OID: SNMPv2-MIB::snmpMIB
……
or, you can choose to snmpwalk using a specific OID just like your nagios check will do when we set it up later on.
# snmpwalk -v 1 -c public 10.2.20.4 READYNASOS-MIB::diskState.4
READYNASOS-MIB::diskState.4 = STRING: "ONLINE"
Looks like we got good output from the ReadyNAS so we must have set it up correctly. We are now ready to work on adding it to our Nagios system. If you need help setting up your Nagios machine, see one of our previous articles on Installing and Configuring Nagios. BE SURE THAT YOU HAVE THE NAGIOS PLUGINS INSTALLED TOO. We will be using the check_snmp plugin.
Define Nagios Commands for ReadyNAS
The next step is to login to your nagios machine and add a new nagios configuration file to put your commands into. Here’s how I did it in my system.
First, edit the nagios.cfg file and add your new cfg files to your nagios configuration. I made 2 separate files: One with the nagios commands and another with a host definition and service definitions for your ReadyNAS. BE SURE TO MODIFY THE TEXT AREAS BELOW ON YOUR MACHINE TO MATCH YOUR PATHING, HOSTNAMES, CONTACT GROUPS, ETC…
cfg_file=/usr/local/nagios/etc/objects/readynas2120-commands.cfg
cfg_file=/usr/local/nagios/etc/objects/readynas2120-host.cfg
Now create the command file:
 # cat >> /usr/local/nagios/etc/objects/readynas2120-commands.cfg <<EOF
define command{
        command_name    check_readynas2120_temperature
        #command_line    $USER1$/check_snmp -H $HOSTADDRESS$ -o READYNASOS-MIB::temperatureStatus.1 -C public -P 2c
        command_line    $USER1$/check_snmp -H $HOSTADDRESS$ -m READYNASOS-MIB -o READYNASOS-MIB::temperatureValue.1 -C public -P 2c
}

define command{
        command_name    check_readynas2120_disk1
        command_line    $USER1$/check_snmp -H $HOSTADDRESS$ -o READYNASOS-MIB::diskState.1 -C public -P 2c
}

define command{
        command_name    check_readynas2120_disk2
        command_line    $USER1$/check_snmp -H $HOSTADDRESS$ -o READYNASOS-MIB::diskState.2 -C public -P 2c
}

define command{
        command_name    check_readynas2120_disk3
        command_line    $USER1$/check_snmp -H $HOSTADDRESS$ -o READYNASOS-MIB::diskState.3 -C public -P 2c
}

define command{
        command_name    check_readynas2120_disk4
        command_line    $USER1$/check_snmp -H $HOSTADDRESS$ -o READYNASOS-MIB::diskState.4 -C public -P 2c
}

define command{
        command_name    check_readynas2120_volumestatus
        command_line    $USER1$/check_snmp -H $HOSTADDRESS$ -o READYNASOS-MIB::volumeStatus.1 -C public -P 2c
}

define command{
        command_name    check_readynas2120_volumefree
        command_line    $USER1$/check_snmp -H $HOSTADDRESS$ -o READYNASOS-MIB::volumeFreeSpace.1 -C public -P 2c -w 250000:100000 -c 99999:0
}
EOF
Now create the host definition and service definition file:
# cat >> /usr/local/nagios/etc/objects/readynas2120-host.cfg <<EOF
define host{
        use                             linux-box
        host_name                       nas2120.mydomain.com
        alias                           NetGear ReadyNAS
        hostgroups                      NAS-BACKUP
        check_period                    24x7
        max_check_attempts              10
        check_command                   check-host-alive
        notification_period             24x7
        notification_interval           120
        notification_options            d,u,r
        contact_groups                  systems
        address                         10.2.20.4
}

define service{
        use                             generic-service
        host_name                       nas2120.mydomain.com
        service_description             PING
        check_command                   check_ping!400.0,80%!5000.0,100%
}

define service{
        use                             generic-service
        host_name                       nas2120.mydomain.com
        service_description             Temperature
        is_volatile                     0
        check_period                    24x7
        max_check_attempts              3
        normal_check_interval           2
        retry_check_interval            1
        contact_groups                  systems
        notification_interval           240
        notification_period             24x7
        notification_options            w,u,c,r
        check_command                   check_readynas2120_temperature
}

define service{
        use                             generic-service
        host_name                       nas2120.mydomain.com
        service_description             Disk 1 Status
        is_volatile                     0
        check_period                    24x7
        max_check_attempts              3
        normal_check_interval           2
        retry_check_interval            1
        contact_groups                  systems
        notification_interval           240
        notification_period             24x7
        notification_options            w,u,c,r
        check_command                   check_readynas2120_disk1
}

define service{
        use                             generic-service
        host_name                       nas2120.mydomain.com
        service_description             Disk 2 Status
        is_volatile                     0
        check_period                    24x7
        max_check_attempts              3
        normal_check_interval           2
        retry_check_interval            1
        contact_groups                  systems
        notification_interval           240
        notification_period             24x7
        notification_options            w,u,c,r
        check_command                   check_readynas2120_disk2
}

define service{
        use                             generic-service
        host_name                       nas2120.mydomain.com
        service_description             Disk 3 Status
        is_volatile                     0
        check_period                    24x7
        max_check_attempts              3
        normal_check_interval           2
        retry_check_interval            1
        contact_groups                  systems
        notification_interval           240
        notification_period             24x7
        notification_options            w,u,c,r
        check_command                   check_readynas2120_disk3
}

define service{
        use                             generic-service
        host_name                       nas2120.mydomain.com
        service_description             Disk 4 Status
        is_volatile                     0
        check_period                    24x7
        max_check_attempts              3
        normal_check_interval           2
        retry_check_interval            1
        contact_groups                  systems
        notification_interval           240
        notification_period             24x7
        notification_options            w,u,c,r
        check_command                   check_readynas2120_disk4
}

define service{
        use                             generic-service
        host_name                       nas2120.mydomain.com
        service_description             Volume Status
        is_volatile                     0
        check_period                    24x7
        max_check_attempts              3
        normal_check_interval           2
        retry_check_interval            1
        contact_groups                  systems
        notification_interval           240
        notification_period             24x7
        notification_options            w,u,c,r
        check_command                   check_readynas2120_volumestatus
}

define service{
        use                             generic-service
        host_name                       nas2120.mydomain.com
        service_description             Volume FreeSpace
        is_volatile                     0
        check_period                    24x7
        max_check_attempts              3
        normal_check_interval           2
        retry_check_interval            1
        contact_groups                  systems
        notification_interval           240
        notification_period             24x7
        notification_options            w,u,c,r
        check_command                   check_readynas2120_volumefree
}
EOF
With that done, restart your nagios service. On CentOS, I do:
(first check that your nagios configuration is right)
# /usr/local/nagios/bin/nagios -v /usr/local/nagios/etc/nagios.cfg
(if that runs fine, then restart nagios)
# service nagios restart
with that, your ReadyNAS should be added to Nagios and you should be able to see it in your browser:

ReadyNAS Nagios Definition
Latest posts by Jeff Staten (see all)
- Configure Your HP Procurve Switch with SNTP - May 5, 2015
- Configuring HP Procurve 2920 Switches - May 1, 2015
- Troubleshooting Sendmail - November 28, 2014

Is the volumefreespace in bytes, KB, MB or GB?
Ryan,
The VolumeFreeSpace number that you are seeing in the Nagios Service Report is in KB.
Jeff
Excellent tutorial. I was having great trouble with this using other guides. Thank you thank you.
I think its in MB though, not KB. At least, thats how the math works out on my NAS.
Thanks Sean. looks like you are right. Thanks!