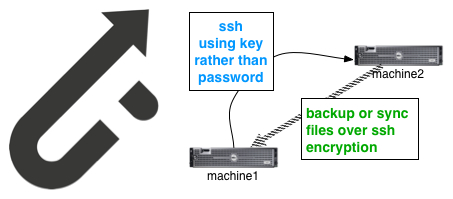
Sometimes you want to copy files directly from one Linux machine to another in an automated task. An example of this would be if you want to sync your wp-contents directory from your WordPress directory directly to another directory on another machine. I have also used this tool to copy backups to another machine. Regardless of what you plan to use it for, here are some simple instructions to automate file copy between machines using rsync over ssh.
Copy Between Machines Using Rsync Over SSH
1. Choose or create users on both machines:
Rsync Your Files Safely From Machine to Machine Using Ssh
In my example, I created a user named tcpa on both machines. Then, I setup machine1 to rsync files to/from machine2. Here’s how I did it.
On Machine #1
| # useradd tcpa # passwd tcpa Changing password for user tcpa. New password: Retype new password: passwd: all authentication tokens updated successfully. |
On Machine #2
| # useradd tcpa # passwd tcpa Changing password for user tcpa. New password: Retype new password: passwd: all authentication tokens updated successfully. |
2. Verify that there is a .ssh directory in the home directory for the user on both machines
If there isn’t one, you can create one simply by starting an ssh to localhost:
| # su – tcpa$ ssh -l tcpa localhost The authenticity of host ‘localhost (::1)’ can’t be established. RSA key fingerprint is 9a:e0:78:ea:40:74:4c:42:8b:61:e8:e0:5b:08:4b:c3. Are you sure you want to continue connecting (yes/no)? yes Warning: Permanently added ‘localhost’ (RSA) to the list of known hosts. tcpa@localhost’s password: <CNTRL-C>$ ls -a . .. .bash_logout .bash_profile .bashrc .mozilla .ssh |
verify that both machines have the $HOME/.ssh directory as per above.
3. Create the Ssh Keys
Now we need to create keys for the users to use with ssh. I typically create the keys on the machine from which I will be doing the bulk of the ssh’ing which I will call the ssh client.
On the rsync ssh client machine:
| $ cd .ssh $ ssh-keygen -t rsa Generating public/private rsa key pair. Enter file in which to save the key (/home/tcpa/.ssh/id_rsa): Enter passphrase (empty for no passphrase): <enter> Enter same passphrase again: <enter> Your identification has been saved in /home/tcpa/.ssh/id_rsa. Your public key has been saved in /home/tcpa/.ssh/id_rsa.pub. The key fingerprint is: fc:ec:b6:cf:e3:81:2b:9b:89:31:87:26:1e:01:7c:20 tcpa@tcpa.1on1.com The key’s randomart image is: +–[ RSA 2048]—-+ |E . | | o . | | o . | | o . | | . S | | . . o . | | o = . + . | | . + =.+.o.. | | . . +++++. | +—————–+ |
Co
4. Now copy the public key to the ssh server –machine2 in this example
From machine1:
| $ scp id_rsa.pub tcpa@ftp.1on1.com:.ssh/authorized_keys The authenticity of host ‘ftp.1on1.com (10.100.100.22)’ can’t be established. RSA key fingerprint is 1c:4c:a2:55:28:dd:51:10:b3:84:bd:4d:d9:fc:d2:16. Are you sure you want to continue connecting (yes/no)? yes Warning: Permanently added ‘ftp.1on1.com,10.100.100.22’ (RSA) to the list of known hosts. tcpa@ftp.1on1.com’s password: id_rsa.pub 100% 400 0.4KB/s 00:00 |
5. Now Verify that we can connect without a Password
From machine1 do:
| $ ssh -l tcpa machine2.uptimemadeeasy.com $ hostname machine2.uptimemadeeasy.com |
Now, Automate the File Copy Between Machines Using Rsync Over SSH
Below is an example of using crontab to schedule the rsync. You will likely want to test the command manually prior. Be sure to backup the destination directory prior in the event that things do not work as you anticipate they will.
The crontab line below will copy the files from the /source/directory/path directory on machine2 to /destination/directory/path on machine1 every hour on the hour.
| 0 * * * * rsync -avz –bwlimit=2000 tcpa@machine2.uptimemadeeasy.com:/source/directory/path/ /destination/directory/path/ |
Be sure to verify that the task is working by verifying the desination directory contents are what you think they should be.
Latest posts by Jeff Staten (see all)
- Configure Your HP Procurve Switch with SNTP - May 5, 2015
- Configuring HP Procurve 2920 Switches - May 1, 2015
- Troubleshooting Sendmail - November 28, 2014