Using Varnish Caching and Proxy

Varnish Can Seriously Speed up Your Webpage’s Performance
If you have a website with lots of static objects like http://uptimemadeeasy.com, then it is likely that you can save some performance by caching those static objects in a memory so that when they are requested, there is no need to go to disk for them. While caching static objects can help your webpage performance immensely, doing it with a proxying tool like varnish can eliminate the need of your Apache daemon from negotiating connections with all of brower clients which will make another huge performance gain for your website. This article will help you to speed up your webpage with varnish.
By implementing varnish proxying / caching on uptimemadeeasy.com I was able to cut down the memory used by Apache significantly all while increasing phenomenally then number of web clients that it can serve and decreasing cpu usage and disk access. These steps below are notes from my installation of Varnish on my Centos 6 box. So, because this is specific to my situation, you may not need to use all of these steps or you may need to perform others.
Install the Varnish Repo
There are several ways to install Varnish, but the simplest by far is by using the Varnish yum repo. This command below installed the latest Varnish repo on my box:
# rpm --nosignature -i http://repo.varnish-cache.org/redhat/varnish-3.0/el6/noarch/varnish-release/varnish-release-3.0-1.el6.noarch.rpm
Install Varnish with Yum on CentOS 6
Now installing Varnish is simple with yum:
# yum install varnish
Configure Varnish to Startup at Boot
# chkconfig varnish on
# chkconfig --list varnish
varnish        	0:off	1:off	2:on	3:on	4:on	5:on	6:off
# service varnish start
Starting Varnish Cache:                                    [  OK  ]
Edit the /etc/sysconfig/varnish File
The main configuration file for Varnish is the /etc/sysconfig/varnish file. In here, one can specify the Varnish listening port, the memory cache size, threads, the vcl file, the storage method and storage_file, etc… in this file. When you are first installing, you are probably interested most in changing the listening port for Varnish and the Varnish storage size. All of the other settings can be tweaked later on.
I set these parameters in my /etc/sysconfig/varnish file:
VARNISH_STORAGE_SIZE=80M
VARNISH_LISTEN_PORT=80
Note that in my case, Apache was running on port 80, so I was certain not to start restart Varnish at this point so that there would not be an IP Port Conflict. You will see me address this later in this article.
Configure the /etc/varnish/default.vcl file
So, a little more background on what I was doing would be in order at this point. Before installing varnish, I had three NameVirtualHosts configured in my Apache configuration each serving a different domain. To make this all work, I changed each domain to listen on a different port: 8001, 8002, 8003 and then configured the Varnish vcl to proxy those domains.
With that introduction, let’s edit the /etc/varnish/default.vcl file. I setup a default proxy backend as well as another for my other domain names that I was originally serving in Apache. I also had to edit the vcl_recv area and setup instructions to use the proper domain backend based on the domain name that the client was requesting:
backend default {
  .host = "127.0.0.1";
  .port = "8000";
}
backend uptime {
  .host = "127.0.0.1";
  .port = "8000";
}
backend otherdomain {
  .host = "127.0.0.1";
  .port = "8001";
}
backend blogs {
  .host = "127.0.0.1";
  .port = "8002";
}

sub vcl_recv {
  if (req.http.host == "www.uptimemadeeasy.com") {
        set req.backend = uptime;
  }
  if (req.http.host == "uptimemadeeasy.com") {
        set req.backend = uptime;
  }
  if (req.http.host == "www.myotherdomain.com") {
        set req.backend = otherdomain;
  }
  if (req.http.host == "myotherdomain.com") {
        set req.backend = otherdomain;
  }
  if (req.http.host == "blogs.otherdomain.com") {
        set req.backend = blogs;
  }
  if (req.url ~ "\.(png|gif|jpg)$") {
        remove req.http.Cookie;
  }
}
I then used this trick I found somewhere to test the vcl file to be sure that it would compile properly. By running this next command, it will test compile it and if it is good, you will see the compiled output to the screen. If there was an error, you would see the error in the output.
varnishd -C -f /etc/varnish/default.vcl
Ok. With our vcf file configured, it is time to move Apache from port 80 to the new ports we specified in the vcl file. We will then startup Varnish which will take the port that Apache was using (80/tcp) and assume all of the traffic it was handling.
First, I changed the single “Listen 80” directive to three lines:
Listen 8000
Listen 8001
Listen 8002
Then, I changed the single “NameVirtualHost *:80” directive to three lines:
NameVirtualHost *:8000
NameVirtualHost *:8001
NameVirtualHost *:8002
Then, I edited each of my virutalhost definitions from <VirtualHost *:80> to <VirtualHost *:8000>, <VirtualHost *:8001>, and <VirtualHost *:8002>.
With that done, I was ready to restart Apache to release port 80. I then verified with netstat that Apache was running on the new ports and not on 80. And then I started up Varnish:
# service varnish restart
Stopping Varnish Cache:                                    [  OK  ]
Starting Varnish Cache:                                    [  OK  ]
And with that, everything was back up and running with Varnish proxying all requests to all three of the websites.
Varnishlog to Watch the Varnish Logs
At some point, you are going to want to know what is happening inside the Varnish daemon. You will look around for a log file and not find one because Varnish keeps all of its logging in memory. You can watch the Varnish output if you like by dropping to a linux shell and running the “varnishlog” command. This will launch a console and display all of the Varnish logging. Additionally, you can start the varnishlog service and have it log to the /var/log/varnish/varnish.log file.
Generating an NCSA Access Log File
If you have run Apache for any length of time, you will be familiar with the access_log file that Apache generates detailing all of the hits your httpd is receiving. You will notice that by moving to Varnish proxying you will now see that all of the access ip addresses have changed from the various end user client addresses, to the Varnish server’s ip address. If you want to watch the end client ip addresses, you will need to get that from the Varnish NCSA log. To get the Varnish NCSA log generating, you need to startup the varnishncsa service. You can modify the service with chkconfig and start it up like we did at the top of this article:
# chkconfig varnishncsa on
[root@obelix varnish]# chkconfig --list varnishncsa
varnishncsa    	0:off	1:off	2:on	3:on	4:on	5:on	6:off
[root@obelix varnish]# service varnishncsa start
[root@obelix varnish]# service varnishncsa stop
Stopping varnish ncsa logging daemon:                      [  OK  ]
[root@obelix varnish]# service varnishncsa start
Starting varnish ncsa logging daemon:                      [  OK  ]
With that, you should begin to be getting access logs in the /var/log/varnish/varnishncsa.log file:
50.160.113.32 - - [14/Jan/2014:19:44:20 -0700] "POST http://www.statenfamily.com/wp-login.php HTTP/1.1" 200 4218 "http://www.statenfamily.com/wp-login.php" "Mozilla/5.0 (Windows NT 6.1; WOW64; Trident/7.0; rv:11.0) like Gecko"
50.160.113.166 - - [14/Jan/2014:19:44:23 -0700] "GET http://www.uptimemadeeasy.com/wp-content/uploads/2013/08/Ruckus7363back-500x450.jpg HTTP/1.1" 304 0 "http://www.uptimemadeeasy.com/linux/boot-centos-into-single-user-mode/" "Mozilla/5.0 (Macintosh; Intel Mac OS X 10.9; rv:26.0) Gecko/20100101 Firefox/26.0"
50.160.113.166 - - [14/Jan/2014:19:44:23 -0700] "GET http://www.uptimemadeeasy.com/wp-content/uploads/2013/08/Screen-Shot-2013-08-21-at-10.16.14-PM-500x450.png HTTP/1.1" 304 0 "http://www.uptimemadeeasy.com/linux/boot-centos-into-single-user-mode/" "Mozilla/5.0 (Macintosh; Intel Mac OS X 10.9; rv:26.0) Gecko/20100101 Firefox/26.0"
Other Varnish Tools
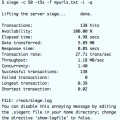
There are some other tools to help you with your Varnish instance. We may write an article on them later on to give more detail on each. But in the meantime, I will just list them here for you to try on your own: Varnishtop – gives good Varnish process information; Varnishstat – gives good counters on the Varnish daemon and health information; varnishhist – graph the speed and whether it was cached of all requests.
Latest posts by Jeff Staten (see all)
- Configure Your HP Procurve Switch with SNTP - May 5, 2015
- Configuring HP Procurve 2920 Switches - May 1, 2015
- Troubleshooting Sendmail - November 28, 2014